Thursday, December 13, 2007

DRY: now for updating your status


A quickie: Statz let's you update your status on a variety of IM clients as well as Tumblr, Twitter.

And remember: Don't repeat yourself!

Wednesday, December 12, 2007

Some not so obvious Leopard features

I've now had some more time to play with Leopard, and I've found a few features that aren't immediately obvious, at least they weren't to me. So, in no particular order:

The slideshow feature in Finder isn't gone. It looks like it has been replaced by Quick Look but holding down the Option (Alt) key when opening the context menu brings back slideshow. I like this much better for viewing a set of pictures or browsing through some movies.

Some Apple applications have special support for Time Machine. This must be described somewhere prominent but I missed it for a good while. Just click on the Time Machine icon in the dock while Mail or Address Book are in the foreground... I like the feature but I don't like the way it is invoked. So far, clicking on an icon in the dock made the application active. Nothing else. Now, however, the result of clicking on an icon in the dock becomes contextual, depending on which other application is active.

Preview now has support for annotations and other markup. Just use the customize toolbar function and have a look around.

There are a few new visualisers in iTunes. And they look good!

Last but now least, change the timezone in one of the dashboard world clock widgets and observe how the hands are animated. I guess, we'll see a lot more gratuitous animations now that core animation has been released.

Sunday, December 2, 2007

Don't worry about TimeMachine partitions

When I upgraded to Leopard I also bought an external harddrive for TimeMachine backups. Now, I want to use the drive with two different laptops and because it's quite big I also wouldn't mind keeping some space for a Tiger install to test my software on that. Reading the forums it became quite obvious that each TimeMachine backup should get its own partition, and here's where the agony began: How large should these partitions be? Yes, you can change partition sizes but if you want to keep the contents intact there are severe limitations. So, you starting thinking about the ordering of the partitions, too.

Luckily, I stumbled across another forum thread, in which people discuss copying TimeMachine backups. Somehow, maybe because of all the hard-link magic, I had assumed this wasn't possible but it turns out that the restore facility in Disk Utility can handle it. This means that even if you get your partition sizes wrong initially, you won't lose your backups when you change them later. You obviously need some temporary space somewhere else, though.

Oh, and if like me you did at some point delete that funny .000d8322fed6 (or similar) file in the root directory of your TimeMachine partition, help's here.

Wednesday, November 28, 2007

Leopard Spots: Quick Look at ZIP Files

The first of the Leopard-specific entries. This site has a Finder plug-in called "Zip Quick Look". You download it, copy it into ~/Library/QuickLook or /Library/QuickLook. Then, in Finder, when you have a ZIP file selected, you can press the SPACEBAR and see something like this:


Way cool.

Tuesday, November 27, 2007

Leopard Customization Command Line Reference

Just stumbled across this list of command line ways to customize Leopard. Not all are useful (IMO), but others might be interested. I don't believe most of these will work on Tiger, so don't bother unless you've upgraded:

http://macosxtips.co.uk/index_files/terminal-commands-for-hidden-settings-in-leopard.html

Thursday, November 15, 2007

Neal's Lint: The Giant Lint Ball

I've been writing about lint recently, and my co-worker Eric showed me this site full of useful lint. There's lots of cool stuff here -- enough to fill your menubar with enough lint to start crowding your menu items off!

Neal's Lint: Delibar

I use del.icio.us to keep track of my bookmarks, and I've installed the requisite buttons in my browsers. But there's a little piece of lint that provides even better access: delibar. It creates a lint item that give you ready access to your bookmarks and, more importantly, instant keyboard access to the list. It also has some handy stuff like the "recent posts" to quickly grab the stuff you've added recently.

Saturday, November 10, 2007

Don't Crack Open Your Mac

OK, repeat after me: I must never open my MacBook Pro...I must never open my MacBook Pro. I recently decided to replace my hard drive because the old one was making a scary sound (partially chronicled here.) You have to unscrew about 20 screws (including some Torx screws, so pay attention to the required tools list). The installation went fine, and I had a new, bigger, faster hard drive. I used it blissfully for a week, sitting on the iCurve stand next to my monitor, using my KVM switch with an external keyboard.

Then, I had to hit the road. When I got to the airport, I pulled out my machine to do some stuff, including starting a document I had to write. Time to get on the plane, so I just shut the lid, put it in my bag, and off to the plane. Once I got on board, I wanted to make a few changes to the document, so I popped open my machine. It was off. That's odd. It should just be asleep. Anyway, I rebooted it. Then, as I was typing, it just quit. No crashing, no complaint, just on one second and off the next. Oh, crap! I'm on my way to give a presentation to a company: this isn't good.

When I landed, I prayed that this was an intermediate problem. I went to a coffee shop and started typing. I noticed that every once and a while, my screen would kind of blink/fuzz out, but just for a split second. While I was typing, I was getting black and white rectangles (little tiny ones) every once in a while, and then the machine locked up hard. Then, using my best forensic debugging skills, I noticed that the fuzzy/squares problem happened when I hit the 7 key. And now I knew what is going on: in the course of replacing the hard drive, I pulled out a ribbon cable or got some junk that's laying on my motherboard right under the 7 key. When I type, it's causing a short. OK, the presentation doesn't require much typing, and I can hit the 7 key very gingerly to avoid the problem.

When I got home that night, I pulled the 20+ screws out again and found the culprit: a little screw (it must have come from the new drive because I had replaced all the original ones) was laying nicely on the top of the motherboard, causing the short every time I hit the key. I de-screwed it, and it's been fine ever since. I'm lucky that it gave me symptoms: if it had just locked up the machine instead of giving me clues, I never would have figured it out.

Repeat after me: I must never open my MacBook Pro...I must never open my MacBook Pro...

Tuesday, November 6, 2007

Neal's Lint: JumpCut

One of the must-have utilities for developers is a clipboard history tool. There are a couple of good ones for the Mac. The one I use is a freebie called JumpCut, which gives you a clipboard with 100 entries.

Another option is iClip, which gives you history on more than one clipboard. I used to use it (it's commercial but cheap) but they recently updated it and went overboard on the eye candy. And, I found after using it that I'm fine with a single entry, simpler one.

Whichever you choose, it's worth spending the time to start using it regularly. Using a clipboard utility changes the way you work. You stop worrying about copying stuff that you might not need, and you stop use the clipboard as a data transfer for batch operations (copy, switch, paste, switch, copy, switch, paste, ad nauseam). In fact, I now proactively put stuff on my clipboard in case I might need it in a few minutes.

Sunday, October 28, 2007

Tasks Bundle for TextMate

I keep my To Do items in a simple text file, for lots of reasons (including the Prags advice to "Keep knowledge in text" from the Pragmatic Programmer). Because I'm a developer, I have lots of tricks to manipulate text, especially in TextMate. Thus, my to-do stuff consists of loosely categorized lists.

The other day, I found a simple but very cool TextMate bundle that provides a couple of commands and syntactic eye candy (the visual equivalent of syntactic sugar) for simple to-do lists. Now I can keep my to-do list in plain text and still get the pretty categorization and other stuff I want. More support for my contention that TextMate is the Swiss-army chain saw of Mac OS X.

Saturday, October 27, 2007

Tweaking TextMate Groovy Bundle

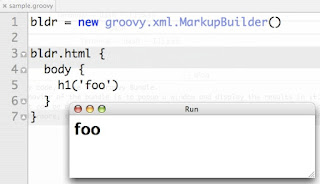
When using TextMate to work with Groovy code, I use the Groovy Bundle. When you run your code, the default behavior of the bundle is to popup a window and display the results in it. This can be a minor inconvenience to problems at times. For one, to quickly see the output especially during a presentation, I find the popup window annoying. Furthermore, the output may not be what you want to see. Take the example of the following Groovy code (saved in sample.groovy):

bldr = new groovy.xml.MarkupBuilder()

bldr.html {
body {
h1('foo')
}
}

When you press Apple R to run it, the popup window shows "foo" instead of the actual HTML output.


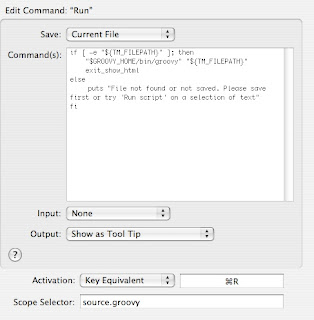
A little tweak to the bundle can fix this problem and make things more convenient. In TextMate, go to Bundles -> Bundle Editor -> Show Bundle Editor and navigate down to the Run command under Groovy.


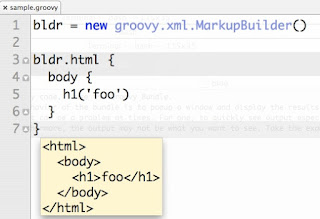
Change the exit_show_html to exit_show_tool_tip. Close the Bundle Editor and back in the TextMate editor, press Apple R to see the output appear as tool tip.

Buying a New Mac

Most of the people reading this already know this, but to those who don't, here's an important public service announcement. I just bought a new Mac. No, wait, that's not the announcement. The way I bought it is.

Instead of just going to the Apple site and buying it, I joined the Apple Developer Connection first with a Select Membership. This membership gives you preview software, developer tools, and some other cool stuff. It also gets you a hardware discount for 1 system per year. Aha! The membership cost me $499. But, the discount on the laptop I bought saved me around $750. Not only did I get a bunch of extra stuff for year (the ADC goodies), but it saved me money in the end. I tend to buy a new laptop every 18 months, so even with a yearly subscription to ADC, I come out exactly even with the money, and I get all the Apple software goodies to boot. Sounds like a good deal to me!

Edit in TextMate Option

A cool trick that appears in the excellent TextMate book from the Prags is the "Edit in Textmate" menu item. If you go to the TextMate sub-menu under "Bundles", you'll see an option to Install "Edit in TextMate". The ensuing popup walks you through the steps to do this. Now, in some applications (like Safari), when you go to a textbox on a web page, you can issue the added Edit | Edit in TextMate command from Safari. TextMate will pop up, and now you have the full editing power of TextMate for your entry. When you hit "save", you'll see the browser's textbox update.

What's even better is that you can make it understand custom syntax. The popup that walks you through installing this option tells you how. So, for example, I'm typing this entry in TextMate, using HTML mode, but it is being automagically saved in the entry field on Blogger. By creating a simple ".plist" file in a special place, you can create custom bundle associations based on the URL you typed in the browser. Or, if that's too much work, the first time you launch a file from a particular web page's textbox, manually set the mode and TextMate will remember it for you. This is the way I type stuff for web pages anymore.

iPhone iPod Trick

Last week I was listening to music on my iPhone when I wanted to quickly pause the music to hear the announcement at the airport gate. Sure, the quickest way I found at that time to stop was to remove the earphone from my ears! I said to myself, there's got to be a easier way to pause the music than pressing the home button (my iPhone is locked most of the time), sliding the bar, pressing iPod key and pressing stop.

Last night I discovered a feature accidentally! When the iPhone is locked, press the home button twice. While it remains locked, the iPod play music slide bar pops up. You can start/stop music, switch to next/previous song, adjust volume using slider (though I prefer using the switch on the side to adjust volume). Now I can easily and quickly pause the music and resume after the interruptions!

iPhone Keypad trick

Switching between the alphabet keys and number/symbol keys on the keypad can be a bit annoying, especially when you want to quickly insert a number or symbol and continue typing text (alphabets).

You can avoid a few extra keystrokes if you press the ".?123" key and then without releasing drag over to the number or symbol you want.

Assume you are typing an email. You want to type "Let's meet at 3." You can type the word Let, then press and hold the key ".?123" and drag over to the single quote and release. The keypad will return back to alphabets after the single quote is inserted. You can type the rest of the message and when you're ready to insert the 3, repeat the same steps this time selecting 3 before you release.

Thursday, October 25, 2007

Neal's Lint: TextExpander

I've been asked several times about the prodigious amount of "lint" I have on my menu bar (those are the little application icons to the right, in what would be the task tray in Windows). So, I'm gonna tell everyone.

First up, TextExpander. This is a key macro utility. Think live templates for your entire operating system. You save whatever text you want to type under an abbreviation and TextExpander automagically expands it for you inline. For example, I type the words "No Fluff, Just Stuff" a lot, so I have a shortcut for it. I'm genetically incapable of spelling the word "Selenium", so I have another for that. I also have chunks of command-line goodies that I used to have as bash aliases, but I got tired of fighting the single-double quote war with bash. Now, I just type the abbreviation to get this:

svn st | grep '^\?' | tr '^\?' ' ' | sed 's/[ \t]*//' | sed 's/[ ]/\\ /g' | xargs svn add
What's even better is that you can determine where you want the cursor to end up by placing a magic marker there. For my Ruby on Rails talk, I need to create a database keyed to the city I'm in, so I use this TextExpander goodie, which leaves my cursor right before "_development".

/opt/local/bin/mysqladmin5 -u root create %|_development
What's more, you can create abbreviations for stuff like dates. Life's too short to be typing the bloody date all the time, so it looks like today is 2007-10-25.

TextExpander is a great example of a "$20-ware" Mac OS X utility (see, I just typed "Mac OS X" with an abbreviation). There are some others like this (like Typinator), but I prefer TextExpander.

Monday, October 22, 2007

iFixIt

My 2-year old MacBook Pro's hard drive started making a really scary sound a couple of days ago anytime I try to put it to sleep (and sometimes just locks up). Bad news! But, hey, it's 2 years old, and I'm getting a new one in literally a week (and my wife is eying my current one with a scary look in her eyes).

So, I bought a replacement hard drive for it and installed it today. Turns out, it's pretty complicated (and verboten by Apple; you void your warranty if you crack your computer open). Along the way, I found this great site: iFixIt. This site walks you through each step for common upgrades, with pictures. I could have figured it out, but this site made it much easier (and let me know that I needed a Torx 6 tool before I started). A lifesaver.

Thursday, October 4, 2007

The Quicksilver Files: Emacs(!) Keybindings

As we all know, emacs is the One True Editor. And, if you've used it, you know that you spend lots of time holding down the CTRL key. Many hard-core Mac/emacs users have re-wired the CAPS-LOCK key (which is useless anyway) to be another control key, saving wear and tear on the wrist and little finger of the left hand. (This by the way can be accomplished in the Keyboard preferences pane.)

The other day I accidentally used the emacs "down one line" command (CTRL-N) while using Quicksilver to navigate the file system...and it worked! Now, I use CTRL-P (up one line) and CTRL-N all the time because it's easier when typing to not have to move to the arrow keys.

Quicksilver: wysiwyg asap

Monday, September 3, 2007

vi Command Line

If you ever spent any quality time in the vi editor, you can't shake off at least some of the keyboard stuff. Of course, vi isn't the friendliest editor in the world (in fact, may in fact be the least tameable). But it is probably the most efficient mechanism for editing single lines of text.

Which brings me to this tip: you can turn on vi keyboard shortcuts for your terminal (either Terminal or iTerm) by adding the following line to your ~/.profile file:
set -o vi
Now, you can happily use that vi knowledge that you can't get rid of otherwise. If you're muscles  can't remember the keystrokes, you can refresh your memory here.

Sunday, August 26, 2007

More Going to Directories

About a month ago, Muness posted a message about using APPLE-SHIFT-G to use filename completion with tabs to go directly to a directory in Finder and Path Finder. Here's a related tip. The same keystroke combination works in standard Apple Open and Save dialogs. You can navigate more quickly to your destination via the keyboard, especially with the ability to tab-complete entries.

Friday, August 10, 2007

Proxy Icons in Finder

Mac OS X is generally easier to use than other operating systems, but it does have its hidden little secrets that you cannot find accidentally. One of those features is proxy icons. In any Mac OS X application (including Finder), you can access the icon for the file you under edit by clicking on the icon in the title bar. Now, you can drag the icon somewhere else to move it to a new location.

The other handy thing you can do it [APPLE]-click on the title bar icon, which shows you where the file lives in the directory structure, as shown here:

Image of Finder proxy icon


Very hidden, but also very useful: no more guessing where a particular file lives or where you are in the directory structure.

Monday, August 6, 2007

Unparalleled Evil

This happened a couple of weeks ago when I was giving a talk. I could not nail it down until today (actually yesterday, but I am still in airport with flight delays) when it happened again, in the middle of another presentation.

On the Mac, when I asked it to open an IDEA ipr file (using quick sliver), it suddenly came up with a dialog asking me if I want to open the application within Windows. "Heck no" was my response. Then it started asking this question for all kinds of files I was trying to open.

First, what seems to trigger this? I upgraded to Parallels 3.0 a few weeks ago. Every thing seems to be normal until I start IDEA within Parallels. I use IDEA mostly on the Mac, but when I give my "Java 6 Features" talk, I bring it up within the Windows Vista in Parallels. Right after this, when I try to launch applications on the Mac, it wants to open them in Windows.

I am not sure if this is the only action that causes this "feature" to be activated. Here is what I did to perform a quick fix. In Parallels, I click on "Applications" menu, and select "Reset Windows Application" menu item. This is only a quick fix. I hope to find a better solution for it.

Thursday, August 2, 2007

Microsoft RDC 2.0 Beta

Microsoft has finally updated their Remote Desktop Client to be more of an OS X app and less of a shell around a protocol. It is now a Universal Binary, supports newer versions of the protocol, allows single sessions with one app installation, screen resizing and better support for printing to Mac-connected printers.

The download can be fetched here.

I haven't tried it yet, but they have also released a plug-in to better support Open Office documents in Word here.

Wednesday, August 1, 2007

The Quicksilver Files: Create New Files from Templates

Those darn Quicksilver guys just won't quit coming up with cool new stuff. Here's one that I read on LifeHacker today. One of the "missing" features in OS X is the ability to create new files from a template from Finder (you know, in Windows, you can right-click and say "New Word Document", for example). You can do the same in Quicksilver, but you get to/have to create your own document templates. The procedure is described here. The advantage is that you get to decide what types of documents for which you want templates, unlike Windows, which spams all kinds of new types onto your right click menu.

Quicksilver: no safety in numbers

Oblique Strategies

Back in 1975, Brian Eno and Peter Schmidt created a creative thinking technique they called "oblique strategies". It was a deck of cards designed to spur creative thought at times when you are blocked because of pressure or external factors. You can buy Oblique Strategy decks at this site. From the introduction to the 2001 edition:

These cards evolved from separate observations of the principles underlying what we were doing. Sometimes they were recognised in retrospect (intellect catching up with intuition), sometimes they were identified as they were happening, sometimes they were formulated.

They can be used as a pack, or by drawing a single card from the shuffled pack when a dilemma occurs in a working situation. In this case the card is trusted even if its appropriateness is quite unclear...


You can also download a Dashboard widget that includes several generations of oblique strategies here. These are a great way to spur out-of-the-box creative thinking when you think you are stuck.

Tuesday, July 31, 2007

Caffeine

One of my presenter buddies turned me on to Caffeine. It's a tiny little application on the menu bar that, when invoked, keeps your Mac from drifting off to sleep, prevents the screen saver from kicking in, or any other behavior that might disrupt your presentation. When done, de-caffeinate your machine by clicking it again.

Wednesday, July 25, 2007

On a bright day, Nocturne

I travel a lot, and often find myself using my Mac and Verizon EVDO card in cabs or shuttles to/from airports to get a feel for the area I'll be at. During bright days, the screen can be hard to read. BlackTree to the rescue: Nocturne.

Nocturne provides a much improved version of the "White on Black" display in the Universal Access preferences pane. It works much better though - I've been told by a friend who's been having vision problems that it works much better for high contrast display.

I'd post a screenshot, but I can't figure how to take one that shows the inverted colors. ;) Try it.

Tuesday, July 24, 2007

Go to directory in Finder and Path Finder

Simple Finder and Path Finder short cut I didn't know about: cmd-shift-g. It pops up a go to directory dialog with tab completion. The Path Finder version is quite a bit more powerful (as most things are when comparing Path Finder to Finder):


Tip courtesy of Neal.

Monday, July 23, 2007

Alternative Drawer for TextMate

I use TextMate a fair bit. The standard file drawer makes resizing it a pain, especially when you're using it full screen.

The other day, at erubycon, Chad Humphries was showing me some of the plugins and bundles that he uses. I just got around to trying out Missing Drawer and it solves that problem - instead of the standard drawer, it modifies TextMate's interface to an Xcode-like project window interface without the drawer. This makes it really easy to resize the file tree.

Mandatory screenshot:
Monday, July 16, 2007

Keyboard shortcut to start application/open file in Finder

If you're using Quicksilver, you won't need this much, except occasionally
when Quicksilver quits unexpectedly.

To open a file or start an application, you may be tempted to hit
the enter key. Sadly, this would let you modify the application/file
name instead of starting or opening it.

To open a file or launch an application in Finder, you can either hit
apple - O or apple - down arrow.

What if you want to open a file using some other application other than
the default? See the related post: The QuickSilver Files: Grabbing the Universe

Sunday, July 8, 2007

Visor

Boy, those Blacktree boys write some good software (you know, like Quicksilver). The latest gem I've found is Visor, which mimics the console found in lots of video games, but for the entire OS, using Terminal. If you spend a lot of time in Terminal, Visor allows you to drop a terminal window down from the top of the screen with a hotkey, then use the same hotkey to slide it away again. It takes a couple of steps to install it, but man is it cool.

Saturday, July 7, 2007

cd to Directory within Terminal

When using terminal, if you need to drill down to different directories, you don't need to type the entire path. You can use tab key to expand file/directory names. For instance if I type cd P and tab, it expands P to Presentations which is a directory I have under my current directory. If there is more than one file or directory that starts with a P, then it lists them all so I can be more specific.

I discovered by accident a related feature. If you hit escape before hitting the tab, it expands all the way to the most recently navigated directory (from your history) that matches what you've entered. For example, since I use Parallels, I have a need to navigate to ~/Documents/Parallels/shared directory on my mac to exchange some files with my Windows Vista (As of this week, I will need this less on recent Parallels 3.0 since the Windows directory is fully exported/mounted on the mac!). I could type cd ~/D and tab, and then P and tab, and then s and tab. Instead, when I type cd ~/ and escape and tab, it expanded straight to cd ~/Documents/Parallels/shared. Very convenient.

One last thing. If you want to open a terminal on any directory, there is a easy Quicksilver way to do that as well.

Go to Quicksilver (ctrl + q on my machine).
Start with the home directory and type first letter or two of the directory you're interested and type forward slash to drill down to that directory in Quicksilver. For example, to go to ~/Documents/Parallels/shared, I type the following characters in sequence ~d/p/s followed by a tab to select an Action in Quicksilver. For the action, type t and it brings up "Go To Directory in Terminal." Hit return and it opens the directory in terminal window.

Related Posts:

The QuickSilver Files: Grabbing the Universe

The QuickSilver Files: Quick Folders and Select All

The Quicksilver Files: Triggers

Command line tips

One of the things I like the most on the Mac is I can open terminal and
play at the command line. I seem to spend about 40% of my time on the
command line.

As you are typing a (lengthy) command, you may find a need to go back and
change it. You can use the left and right arrow to move one character at a time, but that's painful.

You can quickly navigate through that line of command by using some shortcuts.
ctrl-a takes you to the beginning of the line.
ctrl-e takes you to the end of the line
ctrl-w eats the word to the left
ctrl-h eats the character to the left
ctrl-d eats the current character
ctrl-k eats everything to the right of cursor

When I make presentations I find two other tricks very useful.
I often want to clear the screen.
ctrl-L clears the screen. You can type it even when you're in the middle of typing commands.
ctrl-+ will increase the font size (need to hold shift to reach the +).
ctrl-- will decrese the fond size.

Quickly locking your computer using keyboard shortcut

In the previous post, I mentioned how you can use the mouse to lock your Mac.

On Windows I can type Windows + L and lock my computer quickly. It would be nice to do the same on the Mac, right.

You can do that by setting up a trigger in Quicksilver. Neal has talked about Quicksilver and triggers.

If you are still not using Quicksilver, stop reading this blog and go download it right now.

Bring up Quicksilver (I have ctrl + Q setup to activate it, so I type ctrl + Q). Press Apple-' (Apple + single quote) to bring up the Triggers window.

Click on the + in the bottom to create a new trigger. Select Hotkey. Type a dot (period) and enter the following for "Select an Item":
/System/Library/Frameworks/
ScreenSaver.framework/Resources/ScreenSaverEngine.app
Hit tab and leave the Action as "Open." Hit return to save.

Now we're ready to assign a keyboard shortcut/trigger. Double click on "None" for the trigger item you just added and type in your trigger key (for instance Alt and L).

Go ahead the try it out. Press Alt-L (or Option-L) and see if this bring up the screen saver. Of course, I generally like to password protect my computer when I walk away from it. Yes, it is a pain to enter the password several times a day, but that is less painful than compromising the computer.

You can ask your computer require password when you return. Under Security System Preferences (Alt + F4 and type Security and hit return) turn on the check box "Required password to wake this computer from sleep or screen saver."

Quickly locking your computer using one mouse stroke

How do you quickly lock your computer screen on the Mac?

Yes, you may use iAlertU, but sometimes I simply want to lock and not arm my Mac.

You can lock quickly by using the Dashboard and Exposé settings. Press Alt + F4 (or fn + Alt + F4) and type dash in the search window and hit return. This will bring up the Dashboard and Exposé System Preferences dialog. Under Active Screen Saver, select one of the four corners and set it to "Start Screen Saver." For instance, I've chosen the top left corner. Now, close the dialog. Anytime you run the mouse to top left corner, the screen saver should kick in.

You can also configure this under the Screen Saver preferences by pressing the Hot Corners button.

The above steps only started the screen saver. In order to make this really a lock, you need to turn on one more setting (which you may have done already). Under Security System Preferences (Alt + F4 and type Security and hit return) turn on the check box "Required password to wake this computer from sleep or screen saver."

Monday, July 2, 2007

Quick access to System Preferences Dialog

Every time I connect to an external projector, I need to modify settings (depending on projector I am using). I am too lazy (some call it efficient) to be clicking on menus. So, I wanted to get to the settings dialog without any effort.

Press alt + F1 (if you use function keys to control software like I do (see previous post), then press fn + alt + F1) to get to the Display settings quickly. Similarly, you can press alt + F4 (or fn + alt + F4) to get to the Sound settings. Now, what if you want to modify some other settings? Simply press alt + F4 and start typing what you're looking for. For example, to go to Network settings, type "network" and as you type, you will see the relevant items are highlighted (brightness determines the probability of a match for each item). Hit return if the bright match is what you're looking for.

Removing Function key conflicts

This tip may be useful to avoid other conflicts than the example I give below.

I use Parallels to use Windows. I use Visual Studio, to execute my .NET (C#) program. When I typed Ctrl + F5, it ended up conflicting with the Function keys on the Mac (every time I tried to run, it would try to increase the volume of my speaker—not very helpful).

On the Mac, in the Keyboard settings, I turned on the option "Use the F1-F12 keys to control software features. When this option is selected, press the Fn key to use the F1-F12 keys to control hardware features."

Now, if I really want to change the speaker volume, I press Fn + F5 (or Fn + F4), and Ctrl + F5 within Visual Studio (in Parallels) runs my C# program.

Zoom in/out

While giving presentations, I often find it necessary to zoom into the directory structure in the TextMate Drawer window or other parts of the window. I also find a need for this when I want to show some part of the window to someone a couple of feet away. It is very easy to do. Here are two ways:

1. Hold the Ctrl button and run two fingers (index and middle) on the track pad up or down. Alternately, you can hold the Ctrl button and use the middle button of your mouse to move up or down. Then let go and simply move the mouse to areas of windows you like to view while the window is zoomed in. You can modify the settlings for this (like ability to navigate the window while zoomed in) by changing the options next to "Zoom using scroll ball while holding" under the Mouse tab in the Keyboard & Mouse settings.

2. If you're like me and don't want to touch that mouse (or track pad), you can achieve the above operation by holding Applet key, alt key, and pressing the = button. You can then zoom out by pressing Apple + alt + - keys. Again, to configure this, go to Universal Access and check out the "Zoom" options under the "Seeing" tab.

Wednesday, June 27, 2007

The Quicksilver Files: Quick Access to Quicksilver Preferences

Here's a quick one. To customize Quicksilver, you must go to the preferences pane. You can get there by launching Quicksilver and clicking on the gear in the upper right corner. But that's not very Quicksilver, is it? The easier way to get to Quicksilver's preferences is to launch Quicksilver, then hit the -' (that's APPLE + single quote). Instant Preferences pane.

Quicksilver: universal solvent

Sunday, June 10, 2007

The Quicksilver Files: Accessing Application Menus

My friend and co-worker Muness turned me onto this trick the other day (documented here). It allows you to access the menus from the frontmost application through Quicksilver. You have to do the following to turn it on:

  • Turn on "Enable Advanced Features" in Quicksilver

  • Enable proxies in Quicksilver preferences: Under Catalog > Quicksilver, turn on “Proxy Objects”, “Internal Commands”, and “Internal Objects”.

  • To access menu items (and enable the Show Menu Items action), go under Plug-ins > All Plug Ins and scroll down to turn on “User Interface Access (+)”.

  • Make sure you have “Enable access for assistive devices” turned on in System Preferences for the entire OS


Once you have this set up, you can get to the menus by choosing Current Application as the noun and Show Menu Items as the verb. It gives you a list of all the leaf menu items in the current application.

That's sort of cumbersome, so I set up a trigger to make it easier. I created a Quicksilver trigger (for me, keyed off the ALT-ENTER key chord) that automatically launches the list of menu items in the current application. Now, as I'm Mac-ing along, the key chord gives me Quicksilver access to all the menu items, which is even easier than the CTRL-F2 trick shortcut that used to be my favorite.

Quicksilver: access granted

Friday, June 8, 2007

The Quicksilver Files: Triggers

Triggers are one of those categories that I haven't stumbled into much until recently. They allow you to take a Quicksilver noun and verb combination and bind it to a key chord. For example, I issue the noun ~/work/PRDPRG, verb Open with..., and adverb Mate a lot (this opens my Productive Programmer work directory in TextMate). The only problem is that it's a little cumbersome to do that over and over. So, I set up a trigger for that noun, verb, adverb combination and bound it to the CTRL-ALT-1 key. Now, when I hit that keyboard combination, it issues that sequence of Quicksilver commands automatically.

Quicksilver: sleight of hand

Tuesday, June 5, 2007

Auto Un-starting Parallels

I found myself in an interesting rabbit hole the other day. I have a Parallels image set to automatically launch when I open the image and automatically kill Parallels when it's done. Very convenient because you start the VM, it runs Windows, and when you kill Windows, it kills the VM. Very convenient, that is, until you need to make changes to the VM configuration, which you can't do while it's running. After playing Whack-A-Mole for a few minutes, trying to get to the Edit menu before it could start (unsuccessfully, by the way), I did a little digging. It turns out that if you have those settings and you choose your VM from the Parallels catalog, you can hold down the APPLE key as you select it to prevent it from starting.

Saturday, June 2, 2007

Grand Perspective

This is a great little utility that Brian showed me.

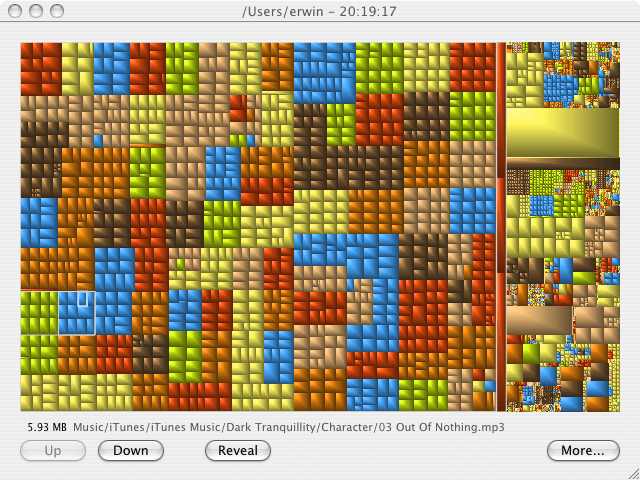
Tonight, my wife Candy was trying to print something, and had to download a new print driver. Suddenly, her hard drive was reporting full, and there's no way that should be. We couldn't figure out why, so we downloaded Grand Perspective. Grand Perspective scans a folder (up to the whole hard drive) and shows a graphical representation of how much space each file occupies, like this:

grand perspective example

We pointed it to her root directory, it trundled away for a few minutes, and made it easy to spot the culprit: an aborted attempt to add a whole bunch of images to iPhoto that had copied them locally. Delete them, and 65+ Gb free again.

Highly special purpose but, if you need it, you need it badly. I'm about to use it to trim my Subversion repository to something a little more manageable.

Tuesday, May 29, 2007

Address Book Tips

Another quick post with a few tips on using the Address Book. I knew a lot of it, but didn't know about merging the cards.

I had printed an envelope to someone the other day quite accidentally, but was amazed at how easy it was.

http://www.macosxtips.co.uk/index_files/address-book-tips.html

Saturday, May 26, 2007

RubyCocoa

Just a quick note to point out that RubyCocoa has been updated. It is still probably not ready for building much production software, but it has clearly come a long way since the earlier releases. Check out the demos for examples of using OpenGL, interacting with the Address Book, wrapping WebKit, etc., all from Ruby:

http://rubycocoa.sourceforge.net/HomePage

Saturday, May 19, 2007

iAlertU

A lot of you already know about this, but I wanted to get it out here just as a convenient place to find the link again. iAlertU is on the slappingturtle.com web site.

iAlertU is a great example of synergising the parts of the Mac. It uses the gyroscope (for parking the hard drive) and any key/mouse motion to trigger it. When you run iAlertU, it appears on the menu bar. Using the remote that comes with the machine, you hold down the MENU key, and you'll get the familiar car alarm "chirp-chirp". The machine is now armed (you'll also notice that the camera turns on). If anyone (like Jay) touches it, it sounds a car alarm, blinks the screen, and snaps a picture of the perp. Closing the lid on the machine silences it, but as soon as it is reopened, the alarm continues.

To turn it off or disarm it, use the remote and hold the MENU key down again. You'll get the single car alarm "chirp", and you're back in business.

Whenever I wander away from my machine around my hot-dogging prone co-workers, or at a conference, I arm my machine now so that it causes a ruckus when disturbed.

Wednesday, May 16, 2007

The TextMate Files: Cool Snippet/bash Interaction

As you may have noticed, TextMate snippets are really just a wrapper around a bunch of serious bash-fu: most of the really cool stuff you can do in snippets is actually bash code (with some helpers). I found a great web link that offers a really good tutorial about some of the fu here, along with some of the helpers.

Here's an example of one of the helpers. The problem: I need to annotate a bunch of Ruby code in RDoc, and I want to add a link to the bottom of the RDoc in every file that points to the source directory of the file in question. But, it needs to be a relative path. There is probably some really much cooler way to solve this, but here is the snippet I created:

---
source: link:../${TM_FILEPATH/\/Users\/jNf\/Documents\/dev\/ruby\/meta-programming\///}

This says to add a horizontal rule (the "---" in RDoc), then do a substitution for the built-in TM_FILEPATH variable, substituting the full path stuff (up to the file name) with nothing. The general syntax for the substitution is ${VARIABLE/pattern/substituion}. The resulting link looks like this:

---
source: link:../16.delegation/forwarding.rb
Which is exactly what I want.

Friday, May 11, 2007

The Quicksilver Files: Clipboard History

Quicksilver plug-ins can add some cool functionality. One great one is the Clipboard History plug-in. Install it from the plug-ins page (which also allows you to set the history size via the plug-in's propteries). Then, when you invoke Quicksilver, hit APPLE-L to get to your clipboard history list. From this clipboard history list, you can paste by either using the arrow keys or using the number that shows up in the left-hand column.

One of the tips in The Productive Programmer is to use clipboard history tools so that you can start copy and pasting in batches, rather than the wrist-achingly inefficient copy-switch-paste-switch-copy-switch-paste operation most people do.

Quicksilver: just your type

Thursday, May 3, 2007

The QuickSilver Files: Quick Folders and Select All

When spelunking the file system with QuickSilver, you can use the "/" key to navigate one level down on a folder and "SHIFT-/" to back up a folder. The combination of this with smart incremental search for names makes QuickSilver more efficient than most Finder operations.

One other file/folder related trick. If you want to select all the files in a folder, navigate into the folder and hit "APPLE -A". This is the standard "select all" keyboard shortcut, but it took me a little while to realize this worked in QuickSilver too.

QuickSilver: let go

Pesky hidden files, beware

I was doing some spring cleaning on my hard drive this morning ("rm -Rf *" -- no, NOT in my home directory...). As an afterthought, I did a "ls -al" to verify that, indeed, everything was gone. To my surprise, there were a couple of StuffIt droppings left behind. ".$$ StuffIt Temp 1143648937" Big 'uns, too. Almost a gig worth of dead air. Them files needed killing.

Strange, though, that they wouldn't die. "rm -Rf *" is the command-line equivalent of "slash and burn, take no prisoners". I was the owner of the files, yet couldn't delete them. Perhaps it was a permissions problem. "sudo rm -Rf *" foiled my all-powerful alter ego, Root, as well. Apparently these files were laced with kryptonite.

The leading "." makes the directory or file hidden, but it shouldn't tattoo it to my hard drive. I'm pretty sure that it was the dollar signs that was slipping bash a mickey. Surrounding the file name in single quotes didn't help -- "rm -Rf '.$$ StuffIt Temp 114364'". Neither did letting the bash shell tab-complete the file name -- "rm -Rf .\$\$\ StuffIt\ Temp\ 114364". This was really beginning to harsh my mellow.

So, I pulled out the big guns. TinkerTool, among other things, gives Finder x-ray vision. It is, refreshingly, a free utility in a sea of $20 Mac add-ons. The very first checkbox on the very first tab of the utility is what I needed -- "Show hidden and system files". Once Finder could see 'em, Finder could delete 'em. Odd that the GUI came through when the CLI failed, but I'm not asking questions.

As TinkerTool rode off into the sunset, I heard him mutter under his breath, "I love the smell of Napalm in the morning." Me too, TT. Me, too.

Tuesday, May 1, 2007

Keyboard Access to Menus and Trays

One of the great things about the Mac is the pervasive keyboard support. When I first started with the Mac, I was kind of annoyed that it doesn't have as much consistency between applications for keyboard shortcuts, and the ALT-key combination style from Windows isn't as well supported (most applications primarily do APPLE-key combinations).

Then I discovered two key keyboard shortcuts: CTRL-F2 and CTRL-F8. CTRL-F2 sends focus to the menu, highlighting the Apple logo on the upper left-hand side. Then, you can start typing the name of the menu you want to invoke. When you hit the one you want, hit RETURN and it opens the menu, ready for more incremental search typing. This I find is even faster than the ALT-key style combinations in Windows because it is consistent across all applications (well, except for abysmally bad applications like Lotus Notes), and you can type the first part of the menu item you want very quickly. Incremental search is a powerful way to get to stuff in a very few number of keystrokes.

CTRL-F8 focuses the task-tray portion of the menu bar, allowing you to highlight some of the icons (like the AirPort icon) and turn on AirPort from the keyboard. CTRL-F8 + some arrow keys gets you into the icons that allow keyboard access.

I recently found another great use for this. I use an EVDO card for ubiquitous Internet, and I've been starting the Verizon Wireless little application to start the Internet connection. I was talking to Jason Hunter this weekend, and he just turns on the modem display (found in the standard Apple utility Internet Connect, you check the "Show modem status in menubar"). This allows me to CTRL-F8 up to the menubar, pull down the list, and get online with EVDO faster.

Sunday, April 29, 2007

The QuickSilver Files: Grabbing the Universe

The first of many, many posts on the subtleties of QuickSilver.

When you have something (anything, really) focused on the screen (i.e., a folder in Finder), you can drag it into the QuickSilver universe by hitting the CTRL-ESC keystroke. That opens QuickSilver with the selected object ready for action.

QuickSilver: pb2au

Saturday, April 28, 2007

Speaking of iTunes

One the examples of serendipitous non-browser mashups from my Data Integration talk features this gem. del.icio.us allows you to specify persistent queries to be exposed as RSS feeds. Now that iTunes supports podcasts and enclosures, you can set up your own free video content (e.g. Quick Time movies tagged as being funny).

Find out how, here.

iTunes + Upcoming.org = iConcertCal

I mentioned a new iTunes visualization plug-in to Neal today at the Reston NFJS show. He got very excited so I thought I would post a link for other folks as well.

There is a visualization plugin called iConcertCal that looks to your iTunes music library for artists that you like and then searches upcoming.org for events with those artists. It goes a couple of months out and does a great job. I've found all kinds of shows that I wouldn't have otherwise known about.

For peripathetics like Neal (that's a pretty good nealogism[sic] for Mr. Ford), this would be a fantastic way to survey shows in the area of wherever you find yourself. It didn't get my address *QUITE* right, but once I fixed it, it has kept up.

It apparently works for the Windows version of iTunes as well.

http://www.iconcertcal.com

Tuesday, April 24, 2007

What the Hell is This?

I was thinking the other day about consolidating all my Mac OS X downloads, tricks, tips, etc. on a wiki somewhere so that I could remember this stuff. I know that Scott Davis and Brian Sletten already have web pages where they have their list of Cool Mac Stuff. It's nice to have when you re-install or move to a new machine. Then, I started thinking "Wow, I'll bet Venkat would like to contribute to that", since we love to pass around Mac goodies. Then, I thought "It would be cool if all the Mac guys I know could contribute, then send me notification when new stuff got added." Then, I realized: I'm talking about a blog!

Welcome the The PragMactic OS-Xer. This is the place where I'm going to post all the cool stuff I find out about a Mac. And I'm inviting others. Anyone who wants can join the posters on this blog and make their own entries. I'm trying to create a nice public forum where all the OS-Xers I know can put cool stuff. And, because it's here, I can get to it when I need to remember all the stuff I need to install on my next Mac.

Hazel

I was just in the process of writing a Mac OS X automator to delete all the files in my downloads folder if they are over a week old (one of the Productive Programmer samples) when I found this: Hazel. It's a cheap-ware preference pane plug in that allows you to set up rules (kind of like a mail reader) for folders and maintenance tasks. I just set up a rule that deletes all downloads that are over a week old (I'm terrible about downloading stuff, unzipping and installing it, but forgetting to get rid of the downloaded archive).

Looks pretty cool, costs $16, and has some nice configuration options.

Thursday, April 19, 2007

Keyboard driven Right Click

Go to Universal Access and turn on Mouse Keys. This the the accessibility option that allows you to drive the mouse strictly from the keyboard, using the embedded keypad. Once you turn that on, you can use the FN-I key to click the mouse, which means that you can use FN-CTRL-I to right click. It's not perfect (it clicks where the mouse current resides, not where the keyboard focus lives) and it precludes using the embedded numeric keypad for doing 10-key entry (which I never do anyway). You can turn it on and off by clicking the OPTION key five times (this is a setting on Universal Access as well).