Apple's Mail.app stores its local data in ~/Library/Mail so all we really need to achieve is encryption of this folder. There are a three simple steps to follow that do exactly that. If you are unfamiliar with the command line this might not be for you, though.
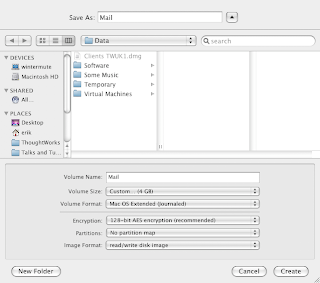
First, you need to create an encrypted disk image. The easiest way to do this is with the DiskUtility application. Make sure that you choose an encrypted read/write disk image with enough room for all your mail. I chose 4 gig as this has a fair bit of room left for me but will allow me to make easy backups onto DVDs. Note that it's not advisable to create a sparse image because these have a tendency to become corrupted on hard resets. Regarding the name for the image, if in doubt use "Mail" as the name. The following screen shot summarises my settings:

Next, mount the image by double clicking it and use Finder to copy the contents of your ~/Library/Mail folder to the disk image. You might want to quit Mail and iCal before doing this.
Then drop into a command line and replace the Mail folder with the disk image: (The trailing dot on the third command is important.)
cd ~/Library
rm -Rf Mail
ln -s /Volumes/Mail .
And that's it! Now all your local email is stored in an encrypted disk image.
When you restart your computer or log out and back in, the Mail volume gets unmounted. If you forget to remount it no harm is done, Mail.app will just crash. So, just mount the image and restart Mail.
There are different opinions on whether it is safe to store the password for the encrypted image in the keychain. If in doubt, don't. This means you will get prompted for the password whenever you mount the image but if you mostly keep logged in and don't restart your computer often this isn't much of a problem.
Update: If you follow the steps above full-text search will not work because that uses Spotlight, which isn't enabled on disk images by default. The following command fixes this problem:
sudo mdutil -i on /Volumes/Mail
It is probably safer to quite Mail before running this command, and it can take a few minutes before the initial index is built; the command returns immediately but you should see activity for a while by a background process.