Monday, November 7, 2011

Building Growl 1.3.1

The new release of Growl is distributed in the App Store and is no longer free. The source code still is, and there are instructions on the Growl site to explain how to build it. Personally, I found the instructions a bit wordy. So, here the short version on how to download, compile, and install Growl from source:

1) If you don't have it, get and install Mercurial from this page: http://mercurial.selenic.com/downloads/

2) Open a Terminal window and enter the following commands
cd /tmp
hg clone https://code.google.com/p/growl/
cd growl
open Growl.xcodeproj

3) In the Xcode window that should have popped up disable code signing for the Growl project, as shown in this screenshot:


4) Back in the Terminal window enter these commands: (Don't enter the backslash, it's just there to indicate that the command continues on the next line.)
xcodebuild -project Growl.xcodeproj -target Growl.app \
-configuration Release
open build/Release

5) The Finder window that should have opened contains Growl.app, which you can copy to a folder of your choice and run.

Remember, due to the App Store Growl no longer checks for updates itself.

Sunday, May 30, 2010

Really removing Google updater

If you have tried some of Google's software, Chrome for example, chances are that you have Google's updater on your system now. You might not even know this because the notices during the install process are easy to overlook, and the updater gets installed in places that you normally don't check.

Whether you want this background process running on your system is a different story, but at a minimum it should disappear when you uninstall the last app from Google; and this is what should happen in theory, but it's not what I've seen in practice.

So, here are the steps to manually uninstall the Google updater.

1) Check the "LaunchAgents" folders in the Library and ~/Library folders for a Google "keystone agent" and remove that.

2) Make sure that the system's launchd doesn't waste time looking for the (now deleted) keystone agent:

launchctl remove com.google.keystone.user.agent

3) Delete the actual updater from either Library/Google or ~/Library/Google.

This should be it. You might have to tweak step 2 depending on what kind of admin rights you had when you installed the Google software as the agent might have been installed on a system rather than a user level.

As a side note: I find it interesting that the installer seems to prefer to write to the system-wide library folder, and only if it doesn't have permission falls back on the user-specific folder. It doesn't ask you, like the system's font, widget, or pref pane installers, where you want it. Surely, only a suspicious mind would assume that this is to avoid making it obvious to the user that some form of background software is installed in the first place...

Friday, December 18, 2009

Batch converting HTML files to PDF using OS X and 'convert' utility

At work we are converting content to a new website. As a part of that conversion, some older content will be archived on the new site in the form of PDF documents.

I needed something to convert HTML documents to PDF. We own Adobe's software and there is an option to convert entire web URLs to a single PDF, but that's not what we needed.
I could convert single URLs using the same Adobe software, but that wasn't an optimum solution either. My boss, through a Google search had found a utility on the Mac called 'convert' which does this.

I automated this through a Bash script call, but we still had problems because the pages were truncated. I went to the directory where the "convert" application was, and found it links to 'cupsfilter' in /usr/bin.

By figuring out what cupsfilter does, I was able to determine the parameters necessary to make the PDFs landscape, and use the page size of A4, which was enough to have it work properly.

The great thing about this is if we would have used the "Save As" feature to save each page to a PDF it would have taken hundreds of hours. Using a Bash shell it took an hour to convert three directories of HTML files with about 150+ files per directory. Even though I used 'convert' I suspect you could do the same thing by using the cupsfilter directly on any UNIX variant.

The key parameter was "landscape" but when using "convert" it wasn't obvious how to specify the parameters correctly. Through cupsfilter man pages I found out what I needed; in cupsfilter it's with a "-o" option, but in "convert" it's using -a. For media format options were "Letter" "Legal" and "A4" but A4 worked best. Letter was a little too small and ended up truncating some of our documents.

Here's my Bash Shell Command that walked through the current
directory finding HTML files with the extension HTM, and for
the output file name used SED (Stream EDitor) to convert the
HTM in the filename to the output file type of PDF.

for name in `ls *.htm` ; do /System/Library/Printers/Libraries/convert -f $name -o `echo $name | sed s/htm/pdf/` -a landscape -a scaling=75 -a media=A4; done

I have to point out that if I was still using a PC I could have probably done this with CygWin but the articles we found on Google indicate the people that did this used convert and I don't know I would have figured out to use cupsfilter instead which is what Mac OS X linked to.

Monday, November 16, 2009

Firefox like Shortcuts in Safari

I've been a Firefox user for years. It was leaps above the other solutions available when I first discovered it, but as of late, the general slowness and high crash frequency have had me wondering once again what else is out there.

I like Safari for the most part, but really hate the default shortcut combinations--opt+cmd-f does not speak to me. Thankfully, I finally stumbled across a wonderful post that details how you can setup Firefox like shortcuts in Safari. It does require a small external app, but I haven't noticed it yet, and the speed of the shortcuts feels as if they're native Safari commands.

Take a look at Roberto's post here if you're interested. Enjoy!

Wednesday, October 28, 2009

Encrypted mail storage without FileVault

If you want to or, like in my case, have to make sure that email is stored encrypted on your laptop the easiest option is to turn on FileVault. This has two disadvantages, though: you lose much of Time Machine's transparency and access to all files in your home directory is slowed down; nothing you'd note when just looking at documents but a slight annoyance when building code. So, what's the alternative?

Apple's Mail.app stores its local data in ~/Library/Mail so all we really need to achieve is encryption of this folder. There are a three simple steps to follow that do exactly that. If you are unfamiliar with the command line this might not be for you, though.

First, you need to create an encrypted disk image. The easiest way to do this is with the DiskUtility application. Make sure that you choose an encrypted read/write disk image with enough room for all your mail. I chose 4 gig as this has a fair bit of room left for me but will allow me to make easy backups onto DVDs. Note that it's not advisable to create a sparse image because these have a tendency to become corrupted on hard resets. Regarding the name for the image, if in doubt use "Mail" as the name. The following screen shot summarises my settings:
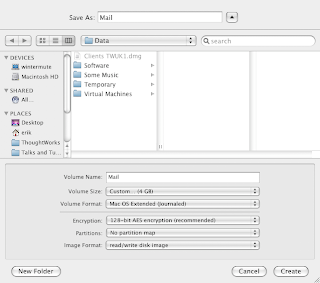

Next, mount the image by double clicking it and use Finder to copy the contents of your ~/Library/Mail folder to the disk image. You might want to quit Mail and iCal before doing this.

Then drop into a command line and replace the Mail folder with the disk image: (The trailing dot on the third command is important.)

cd ~/Library
rm -Rf Mail
ln -s /Volumes/Mail .

And that's it! Now all your local email is stored in an encrypted disk image.

When you restart your computer or log out and back in, the Mail volume gets unmounted. If you forget to remount it no harm is done, Mail.app will just crash. So, just mount the image and restart Mail.

There are different opinions on whether it is safe to store the password for the encrypted image in the keychain. If in doubt, don't. This means you will get prompted for the password whenever you mount the image but if you mostly keep logged in and don't restart your computer often this isn't much of a problem.

Update: If you follow the steps above full-text search will not work because that uses Spotlight, which isn't enabled on disk images by default. The following command fixes this problem:

sudo mdutil -i on /Volumes/Mail

It is probably safer to quite Mail before running this command, and it can take a few minutes before the initial index is built; the command returns immediately but you should see activity for a while by a background process.

Monday, October 19, 2009

Building a Hackintosh

Just a quick note to say that I've successfully built a Hackintosh. The full report can be found here.

Tuesday, October 6, 2009

QuickLook for Markdown Documents

I'm a huge fan of the Markdown simplified markup language and try to use it for most of my prose. There are lots of tools out in the world to transform Markdown into other formats: Markdown itself does HTML, but you can also get a tool like Pandoc with a huge number of output formats for Markdown.

However, one piece I was missing is the ability to "Quick Look" Markdown documents within Finder. Be default, it shows the generic "I'm a file" icon when you do Quick Look, and I would like either just the text or the rendered results.

Found it! QLMarkdown is a utility that you add to your ~/Library/QuickLook folder and gives you the rendered rich output from your markdown source document (and it works with either the ".md" or ".markdown" extensions). One more piece of the puzzle solved.