Monday, November 7, 2011

Building Growl 1.3.1

The new release of Growl is distributed in the App Store and is no longer free. The source code still is, and there are instructions on the Growl site to explain how to build it. Personally, I found the instructions a bit wordy. So, here the short version on how to download, compile, and install Growl from source:

1) If you don't have it, get and install Mercurial from this page: http://mercurial.selenic.com/downloads/

2) Open a Terminal window and enter the following commands
cd /tmp
hg clone https://code.google.com/p/growl/
cd growl
open Growl.xcodeproj

3) In the Xcode window that should have popped up disable code signing for the Growl project, as shown in this screenshot:


4) Back in the Terminal window enter these commands: (Don't enter the backslash, it's just there to indicate that the command continues on the next line.)
xcodebuild -project Growl.xcodeproj -target Growl.app \
-configuration Release
open build/Release

5) The Finder window that should have opened contains Growl.app, which you can copy to a folder of your choice and run.

Remember, due to the App Store Growl no longer checks for updates itself.

Sunday, May 30, 2010

Really removing Google updater

If you have tried some of Google's software, Chrome for example, chances are that you have Google's updater on your system now. You might not even know this because the notices during the install process are easy to overlook, and the updater gets installed in places that you normally don't check.

Whether you want this background process running on your system is a different story, but at a minimum it should disappear when you uninstall the last app from Google; and this is what should happen in theory, but it's not what I've seen in practice.

So, here are the steps to manually uninstall the Google updater.

1) Check the "LaunchAgents" folders in the Library and ~/Library folders for a Google "keystone agent" and remove that.

2) Make sure that the system's launchd doesn't waste time looking for the (now deleted) keystone agent:

launchctl remove com.google.keystone.user.agent

3) Delete the actual updater from either Library/Google or ~/Library/Google.

This should be it. You might have to tweak step 2 depending on what kind of admin rights you had when you installed the Google software as the agent might have been installed on a system rather than a user level.

As a side note: I find it interesting that the installer seems to prefer to write to the system-wide library folder, and only if it doesn't have permission falls back on the user-specific folder. It doesn't ask you, like the system's font, widget, or pref pane installers, where you want it. Surely, only a suspicious mind would assume that this is to avoid making it obvious to the user that some form of background software is installed in the first place...

Friday, December 18, 2009

Batch converting HTML files to PDF using OS X and 'convert' utility

At work we are converting content to a new website. As a part of that conversion, some older content will be archived on the new site in the form of PDF documents.

I needed something to convert HTML documents to PDF. We own Adobe's software and there is an option to convert entire web URLs to a single PDF, but that's not what we needed.
I could convert single URLs using the same Adobe software, but that wasn't an optimum solution either. My boss, through a Google search had found a utility on the Mac called 'convert' which does this.

I automated this through a Bash script call, but we still had problems because the pages were truncated. I went to the directory where the "convert" application was, and found it links to 'cupsfilter' in /usr/bin.

By figuring out what cupsfilter does, I was able to determine the parameters necessary to make the PDFs landscape, and use the page size of A4, which was enough to have it work properly.

The great thing about this is if we would have used the "Save As" feature to save each page to a PDF it would have taken hundreds of hours. Using a Bash shell it took an hour to convert three directories of HTML files with about 150+ files per directory. Even though I used 'convert' I suspect you could do the same thing by using the cupsfilter directly on any UNIX variant.

The key parameter was "landscape" but when using "convert" it wasn't obvious how to specify the parameters correctly. Through cupsfilter man pages I found out what I needed; in cupsfilter it's with a "-o" option, but in "convert" it's using -a. For media format options were "Letter" "Legal" and "A4" but A4 worked best. Letter was a little too small and ended up truncating some of our documents.

Here's my Bash Shell Command that walked through the current
directory finding HTML files with the extension HTM, and for
the output file name used SED (Stream EDitor) to convert the
HTM in the filename to the output file type of PDF.

for name in `ls *.htm` ; do /System/Library/Printers/Libraries/convert -f $name -o `echo $name | sed s/htm/pdf/` -a landscape -a scaling=75 -a media=A4; done

I have to point out that if I was still using a PC I could have probably done this with CygWin but the articles we found on Google indicate the people that did this used convert and I don't know I would have figured out to use cupsfilter instead which is what Mac OS X linked to.

Monday, November 16, 2009

Firefox like Shortcuts in Safari

I've been a Firefox user for years. It was leaps above the other solutions available when I first discovered it, but as of late, the general slowness and high crash frequency have had me wondering once again what else is out there.

I like Safari for the most part, but really hate the default shortcut combinations--opt+cmd-f does not speak to me. Thankfully, I finally stumbled across a wonderful post that details how you can setup Firefox like shortcuts in Safari. It does require a small external app, but I haven't noticed it yet, and the speed of the shortcuts feels as if they're native Safari commands.

Take a look at Roberto's post here if you're interested. Enjoy!

Wednesday, October 28, 2009

Encrypted mail storage without FileVault

If you want to or, like in my case, have to make sure that email is stored encrypted on your laptop the easiest option is to turn on FileVault. This has two disadvantages, though: you lose much of Time Machine's transparency and access to all files in your home directory is slowed down; nothing you'd note when just looking at documents but a slight annoyance when building code. So, what's the alternative?

Apple's Mail.app stores its local data in ~/Library/Mail so all we really need to achieve is encryption of this folder. There are a three simple steps to follow that do exactly that. If you are unfamiliar with the command line this might not be for you, though.

First, you need to create an encrypted disk image. The easiest way to do this is with the DiskUtility application. Make sure that you choose an encrypted read/write disk image with enough room for all your mail. I chose 4 gig as this has a fair bit of room left for me but will allow me to make easy backups onto DVDs. Note that it's not advisable to create a sparse image because these have a tendency to become corrupted on hard resets. Regarding the name for the image, if in doubt use "Mail" as the name. The following screen shot summarises my settings:


Next, mount the image by double clicking it and use Finder to copy the contents of your ~/Library/Mail folder to the disk image. You might want to quit Mail and iCal before doing this.

Then drop into a command line and replace the Mail folder with the disk image: (The trailing dot on the third command is important.)

cd ~/Library
rm -Rf Mail
ln -s /Volumes/Mail .

And that's it! Now all your local email is stored in an encrypted disk image.

When you restart your computer or log out and back in, the Mail volume gets unmounted. If you forget to remount it no harm is done, Mail.app will just crash. So, just mount the image and restart Mail.

There are different opinions on whether it is safe to store the password for the encrypted image in the keychain. If in doubt, don't. This means you will get prompted for the password whenever you mount the image but if you mostly keep logged in and don't restart your computer often this isn't much of a problem.

Update: If you follow the steps above full-text search will not work because that uses Spotlight, which isn't enabled on disk images by default. The following command fixes this problem:

sudo mdutil -i on /Volumes/Mail

It is probably safer to quite Mail before running this command, and it can take a few minutes before the initial index is built; the command returns immediately but you should see activity for a while by a background process.

Monday, October 19, 2009

Building a Hackintosh

Just a quick note to say that I've successfully built a Hackintosh. The full report can be found here.

Tuesday, October 6, 2009

QuickLook for Markdown Documents

I'm a huge fan of the Markdown simplified markup language and try to use it for most of my prose. There are lots of tools out in the world to transform Markdown into other formats: Markdown itself does HTML, but you can also get a tool like Pandoc with a huge number of output formats for Markdown.

However, one piece I was missing is the ability to "Quick Look" Markdown documents within Finder. Be default, it shows the generic "I'm a file" icon when you do Quick Look, and I would like either just the text or the rendered results.

Found it! QLMarkdown is a utility that you add to your ~/Library/QuickLook folder and gives you the rendered rich output from your markdown source document (and it works with either the ".md" or ".markdown" extensions). One more piece of the puzzle solved.

Monday, June 29, 2009

Tidying up Finder's "Open With" menu

Many applications can open common file types such as HTML or JPG, and they all, conveniently, get an entry in Finder's "Open With" contextual menu. Under many circumstances this is even true for applications that are installed in VMware Fusion or Parallel Desktop. Unfortunately, when you delete these applications, or you decide that you don't want applications in virtual machines to open files, the context menu items remain. In my case some context menus became cluttered to the point of being unusable.

This is such an obvious problem that I expected to find an answer using Google straight away. Maybe my search skills failed me but it took me a good while to find the right answer for Leopard, which is why I want to share it here.

There is this article on Lifehacker. However, the article itself has it wrong; the real solution is in a response by "mtts" halfway down the page, and even then the command doesn't work as described on Leopard. What did the trick for me, on Leopard, was the following command:

/System/Library/Frameworks/CoreServices.framework/Versions/A/Frameworks/LaunchServices.framework/Versions/A/Support/lsregister -kill -r -domain local -domain system -domain user

There is no manpage for lsregister but invoking it without any arguments will display some help.

Tuesday, May 26, 2009

Mac Boot Mysteries

This is long, digressive story about diagnosing a hardware problem on a Mac; if you dislike such stories, feel free to leave now.

About a week ago, my wife Candy complains to me that her Mac won't boot up. This is my hand-me-down Mac (we have a new policy in our house: Candy gets my hand-me-down computers, and I get her hand-me-down cameras), which means that it's about 2 years old, but it has a relatively new hard drive that I installed last November. A long time ago, I had set the startup option to always run in Verbose startup mode (on demand by holding COMMAND-V upon startup, or permanent by issuing the following command:

sudo nvram boot-args="-v"

Anyway, I could see from the startup porn that she was having a kernel panic with 2 likely suspects: the fan control daemon and something about Cisco VPN. Now, Candy doesn't have a Cisco VPN, but given that this was my hand-me-down machine, that explains why some of that stuff is there. Candy hadn't installed anything in the last week or so, leading me to think that one of these two was the culprit. She had been complaining that her machine was getting slower and slower, including things like window resizing, which had me puzzled. Perhaps a dying fan was causing the processor to overheat and thus slow down?

I tried safe boot (no joy), and at this point I suspect the fan. I'm certainly not afraid to crack open a Mac (with proper respect), but replacing a fan isn't high on my list of fun things to do, so we made an appointment at the Genius bar. To Candy's credit, she had a SuperDuper! backup that was just a couple of days old, so virtually everything was safe.

We went to the genius bar where the GenX slacker (this is a compliment) booted the Mac from an external drive. I hadn't tried this (even though I have several bootable drives laying around) because I was fixated on the fan problem. After booting it up, his suspicion now lies with the VPN stuff, and I reluctantly concur (especially after he ran some fan diagnostics). Now, though, the question remains: why did this problem suddenly occur? What was his (depressing) advice to fix this problem? Reinstall Leopard and all your applications. What?!? Is this a freakin' Windows machine? I couldn't believe that was real Genius advice. I've never yet had to do a ground-up reinstall of everything, but if that's the only way...hmmmm. He was very knowledgeable, and obviously he doesn't tread in the realm of VPN stuff. He also correctly pointed out that a bad fan shouldn't cause slowness: redrawing windows is mostly handled by the GPU on the Mac. The slowness was as far as I can tell a red herring.

When I got home, the first thing I did was boot Mac OS X from an external drive and get a real SuperDuper! snapshot, getting the real current snapshot. Once I have that, I can play. Candy has already agreed to the pain and degradation of reinstalling everything, but I have to think there's a better way. Then, I had a brain storm: I took the SuperDuper! snapshot I just made and booted the machine from the external drive. Success! That suggests that some part of the internal hard drive that houses the VPN stuff has somehow gotten corrupted, but still allows it to boot using the same image from an external drive. Because I have the SuperDuper! safety net, I decided on an experiment. I reformatted the internal hard drive and ran Drive Genius on it to scan for bad sectors. Nothing of note came from that, but then I overlaid my most recent SuperDuper! snapshot back onto the internal drive.

Success! The internal drive now boots, and everything appears back to normal. I'm guessing that my bad sector theory was correct.

Lessons:

  • Don't reinstall everything! My record is still clean on that account: I have never had to do that on a Mac yet (and it was a once-a-year chore on Windows because of bit rot).

  • Always have good backups. This would have been a tragedy rather than a comedy if Candy hadn't been using SuperDuper!. It has yet to let me down, and it has saved my bacon on several occasions.

  • I immediately latched onto the fan because it seemed to support other observed phenomena. I should have booted it myself from an external drive and run Drive Genius, but I thought I had it figured out.

  • Stop and think. It was a good thing that we had dinner plans with a neighbor when we got back from the genius bar. It was over dinner that I had the idea of just overlaying the snapshot again. If I had started on it as soon as we got back, I would have been creating a lot of movement without a lot of forward progress. Sitting and thinking about it opened my mind to alternative options.

  • SuperDuper! rocks. I can't imagine life without it.

Saturday, January 17, 2009

SmartSleep Preference Pane

A while back, Erik blogged about the Unsafe Sleep setting for Macs, allowing for ultra-quick sleep and wake up. The only two problems: 1) it takes a little terminal magic to set new defaults for your machine and 2) you can't change the battery when the machine is only asleep (thus, "unsafe" sleep).

Now that's changed with the SmartSleep preference pane. It allows you to set all the possible settings plus a new one. From the preference pane itself:

  • smart sleep: sleep if battery charge is above the sleep & hibernate level. Hibernates only when battery charge is below 5% or less than 5 minutes.
  • sleep: machine will go to sleep only (saves state in RAM only, battery keeps RAM contents)
  • sleep & hibernate: machine sleeps and hibernates. (default)
  • hibernate only machine will go to hibernate only. (saves state on disk, battery will not be used)
The first one is new: it dynamically allows the machine to do "unsafe sleep" until the battery gets low, then switch to "sleep + hibernate", allowing changing the battery while the machine is asleep. Very nice: best of both worlds.

Monday, December 8, 2008

MenuMeters & Text

Lots of OS X geeks I know use Menu Meters to monitor the goings on for their machines. But here's a nuance that remembered last week, watching one of my colleagues give a presentation. I can't remember exactly where I heard (overheard?) this, but apparently it's quite relatively expensive to paint letters and numbers on the task area of the menu bar as opposed to graphics. Not sure why, and it may just be a rumor, but in any case, I tend to keep the graphical version of the CPU meters up, not the numeric one, just in case.

Wednesday, November 19, 2008

Open in Terminal (4 Ways)

One of the cool little helpers I talk about in The Productive Programmer is "Command Prompt Here" or "Bash Here": little context menu items for Windows that allow you to select a folder in Explorer, right click, and open a command prompt (or bash shell, if you are using Cygwin) at that location. Someone recently asked me if you can do this on the Mac, and it turns out you can, in a surprisingly large number of ways.

The first way leverages Automator to create a little script that makes an Automator plug-in for Finder. This trick appears here. The cool thing about this tip is the stuff it teaches about building Finder extension via Automator, which is a pretty cool subject unto itself. However, the bad thing about the final solution proffered by this tip is the location where the context menu appears: 2 levels down in the right-click menu, under Automator. Too much clicking.

Not being satisfied with the above, I found an alternative, which creates a toolbar icon at the top of Finder that opens the current selected folder (or the folder of the currently selected file) when you click on it. This trick appears here. The only downside of this version is the number of windows it spawns: one per request, instead of opening new tabs (it was created before Terminal supported tabs in Leopard). So, not to be outdone, the author describes the steps to upgrade it to tabbed terminal in Leopard here. One gotcha exists in his instructions: he says to replace the original script with the one found on this page, but I assumed you could do that with a text editor. It turns out that you need to use the script editor that launches when you double-click the main.scpt file. Otherwise, it works like a charm.

The reason I haven't pursued this before on the Mac? I generally use PathFinder, which includes not only a context menu for "Open in Terminal", it also has an embedded Terminal, which opens in the current folder. Highly recommended, but it you don't want to spend the money, you can get the same effect by harvesting the links in this entry.

Tuesday, August 19, 2008

The New Backup Strategy

Before Leopard, I had a specific backup strategy for both my volatile content (things like source code, documents, etc) and my entire hard drive, which was a snapshot backup. The volatile documents solution was Subversion, kept on a remote, universally accessible machine. The snapshot backup was handled by SuperDuper, which backs up your entire drive in a bootable state, essentially creating a complete snapshot of your hard drive. A couple of problems reared up because of this setup.
  1. I had to handle the "package" files (the ones created by Apple iWork, like Keynote and Numbers) files specially, because Subversion didn't like the way the applications managed the contents. Basically, I had to zip/unzip them for version control. This wasn't terrible (I automated the process to a large degree), but still a little annoying.
  2. My Subversion repository was huge, because I had my entire Documents folder in it. However, most of the documents were there just so that I could have a backup, not because I wanted to version them. The only files I really versioned where the source files and related content.
The advent of Leopard and Time Machine changed my strategy. First, I separated out the Documents stuff for which I really only wanted backups and let Time Machine handle them. I put all my versionable files (like source files) in a new, much smaller Subversion repository. And, even though I have Time Machine, I still use SuperDuper to create backups. The reason I use both:
  • I want the hourly, behind the scenes backup provided by Time Machine.
  • I want to be able to browse backwards in time to look at previous versions of those files, and the Time Machine UI is gorgeous for that.
  • Time Machine alone isn't sufficient. To restore from Time Machine, you have to boot your machine from a startup disk, then restore the backup. Yuck! I still like SuperDuper's snapshot approach, which I've proven to myself works flawlessly (see Don't Crack Open Your Mac for the story).
  • SuperDuper and Time Machine can share the same drive, so I have a single 500 GB drive that has all my backups on it.
  • It's now easier to replicate the source code in more places (IOW, more machines) because it's much smaller.
  • You can tell Time Machine to only backup certain directories (or, more specifically, exclude directories you don't want backed up). Because I only use Time Machine for my Documents folder, it takes only a little space.
  • Because SuperDuper creates a bootable drive image, and my external drive is FireWire, I can boot another MacBook Pro with the external drive. Yes, it's slow, but if the worst happened while on the road, and I've got to present at a conference, as long as I can borrow/steal another machine, I can boot into my machine from backup and do my presentation.
I've been using this approach for a while, and it works nicely. I leave the external hard drive hooked up all the time, and start a snapshot backup at bedtime every night. SuperDuper has a nice option that will sleep the computer when it's finished it's work. So far, this it working out really well. I haven't had to restore the whole drive from SuperDuper yet on this machine (but I know that works -- I've done it on other machines), and I have used Time Machine to grab a file that accidentally got deleted.

Monday, August 11, 2008

Keyboard Zoom

This is a re-blog from Jack Dempsey, setting up a keyboard shortcut to Zoom.

This works well because almost all Mac applications include the Zoom menu item on the Window menu.

Thanks, Jack.

Thursday, August 7, 2008

Quick Blank

This was left by Emilio as a comment to the Quick Sleep entry from before, but I'm afraid not enough people read the comments so I'm promoting it to full-blown entry.

The keychord CTRL-SHIFT-EJECT instantly blanks the screen, without invoking the screen saver. It's just instant blank. Note that it will not lock the screen if you have passwords turned on for the screen saver, it just makes the screen blank. Still, pretty cool.

Saturday, August 2, 2008

Keynote Mode for Keynote

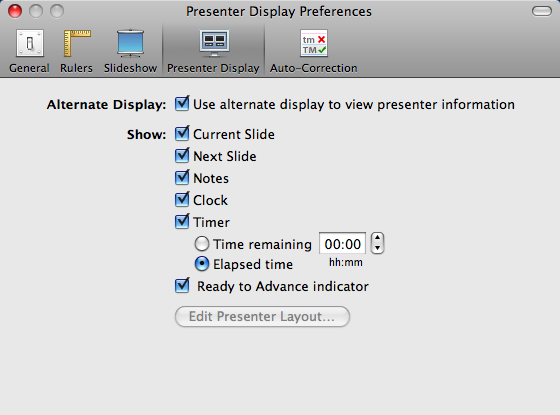
Several people have asked me how to turn on Keynote mode in Keynote. Keynote mode is where the presenter sees a different view from the audience. In Keynote, you can set up a mode that allows you to see the current slide, the upcoming slide, the time of day, the elapsed time from when you showed the first slide, and the "ready to progress" bar (a red/green bar at the top of the screen that lets you know that all the transitions have completed successfully). To get Keynote mode to work, you must set a particular set of options in Keynote preferences, and getting the combination is just rigth is tricky (especially if you aren't connected to a projector). To show the magic combination, here are the settings I use. First up, the Preferences dialog that controls what you (the presenter) sees:


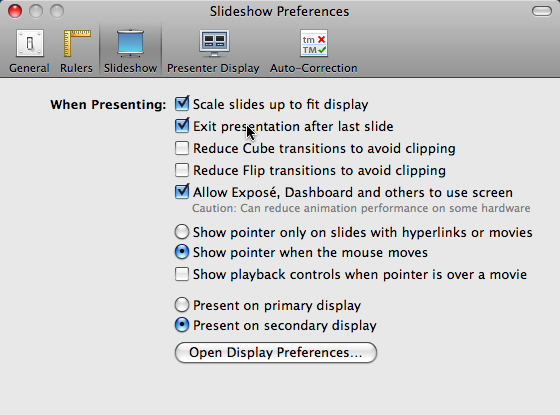
The other settings appear on the the Slideshow Preferences dialog, shown here:


This is the dialog that controls Keynote's projection options. The important options here are the Allow Epose, Dashboard, and others to use screen, which allows you to see the mouse cursor and interact with the screen even when slides are showing, and the Present on secondary display, which uses the projector (i.e., the external monitor) to show the slides.


There are a couple of caveats to using Keynote mode. First, you must un-mirror your display (found on Display Preferences, under System Prefereces). I usually use the option in Display Options to place them on my menu bar, so that I have easy access to the Display Prefereces. When you un-mirror your display, it is exactly the same as using an external monitor. That means that you can't really do code demos and such unless you want to look over your shoulder. That's why most of my slides how have source code embedded on the slide, so that I can use Keynote mode.

Wednesday, July 23, 2008

Quick Sleep

Here's a quickie, but I showed this to Venkat, and it made his day, so chances are good that others don't know about this handy keyboard shortcut. I used to always rely on my PowerBook to go to sleep successfully when I close the lid. But every once in a blue moon, something doesn't work right, and I open my laptop bag to a red-hot laptop. I suspect that it's latch related (and several other folks have suggested that this was the case). Now, I've taken to putting my machine to sleep before closing the lid. There are of course a variety of ways to do that; my recent common one was to hit the power button, which gives you the shut-down options dialog, and sleep is one of them. That's what Venkat's been doing.

But I recently ran across a better combination: Apple-Alt-Eject provides instant sleep (the Eject key is the one that ejects CD's, just above the delete key). One keyboard chord, and I have a sleeping laptop. I love it when I can cut a 2-step process down to a single keychord!

Thursday, July 3, 2008

Mmmmmmmm...Fresh Apps

One of my ThoughtWorks colleagues turned me on to this one. Most Mac OS X applications check for updates on startup (so many, in fact, that I'm surprised when I let something that doesn't do this get out of date). But each application has to do this on their own. That's where AppFresh fits. From the site:


AppFresh helps you to keep all applications, widgets, preference panes and application plugins installed on your Mac up to date. All from one place, easy to use and fully integrated into Mac OS X. AppFresh works by checking the excellent osx.iusethis.com for new versions and lets you download and install available updates easily.


Not only does it find the applications you need to update (which they mostly do themselves...mostly), AppFresh also handles the chore of downloading the DMG file, extracting it, mounting it, installing the application, and unmounting. No muss, no fuss. You just tell it to update an application and Voila...it's updated.

Saturday, June 28, 2008

Pimp my shell


When I switched over to Ruby development, I said goodbye to Eclipse and IDEA. I was never one to shy away from a terminal so the transition back to a text editor (I tend to use TextMate and ViM) and iTerm was an easy one.


At ThoughtWorks I worked on one client project at a time, and maybe one or two open source ones. Now at Relevance there are weeks when I work on four client projects and a half dozen open source projects (thanks to open source Fridays). To make things more difficult, I've got a mix of Subversion and Git projects.


To ease the transition back and forth between projects I:


None of these was especially difficult but each of them has improved my shell environment. Thanks to Alan Cooper and Edward Tufte, I am beginning to understand that good usability doesn't necessarily require difficult technical solutions. Indeed, coming up with each idea and a seamless UI for it was harder than implementing it.


The features described above came down to making my shell environment:


  • Tell me about my current context.

  • Adjust based on the context.


I think that part of the reason we use MacOS is because it does some of this for us. It changes the menus based on which app is in focus. CoverFlow gives us a visual indication of where we are in the stack of files we're looking at. Maximizing a Safari.app window only maximizes it as far as it needs to in order to horizontally fit the content.


What else do you think your shell environment should do for you? Why?

Wednesday, June 25, 2008

Opening emailed Office documents

How hard can it be? I upgraded to Office 2008 SP1 on my work laptop (I only use iWork on my home machine) and now I can't seem to open Microsoft Office documents that have been emailed to me. How could they break this? Well, long story, and I'm actually more interested in fixing it. So, following these steps did it for me:

* Download MisFox, then double-click on "MisFox.prefPane" to install
* In the MisFox system preferences pane pick the File Mappings tab
* Scroll down the list till you find "Word Document" and the .doc file extension
* Double click on that line to open the editor
* Set the Creator Code to MSWD and the File Type to W8BN
* Check "Resource Fork is Significant"
* Repeat last steps for Excel, setting the code to XCEL and the type XLS8
* Repeat for Powerpoint, setting the code to PPT3 and the type to SLD8

Thanks to my colleagues at ThoughtWorks for figuring this out.